
If you’re using a computer:
- Update Flash
- If you’re using Internet Explorer, make sure to disable compatibility mode
- If the above solutions don’t fix the problem, try an alternate browser
If you’re using an iPad:
- Clear cookies and cache
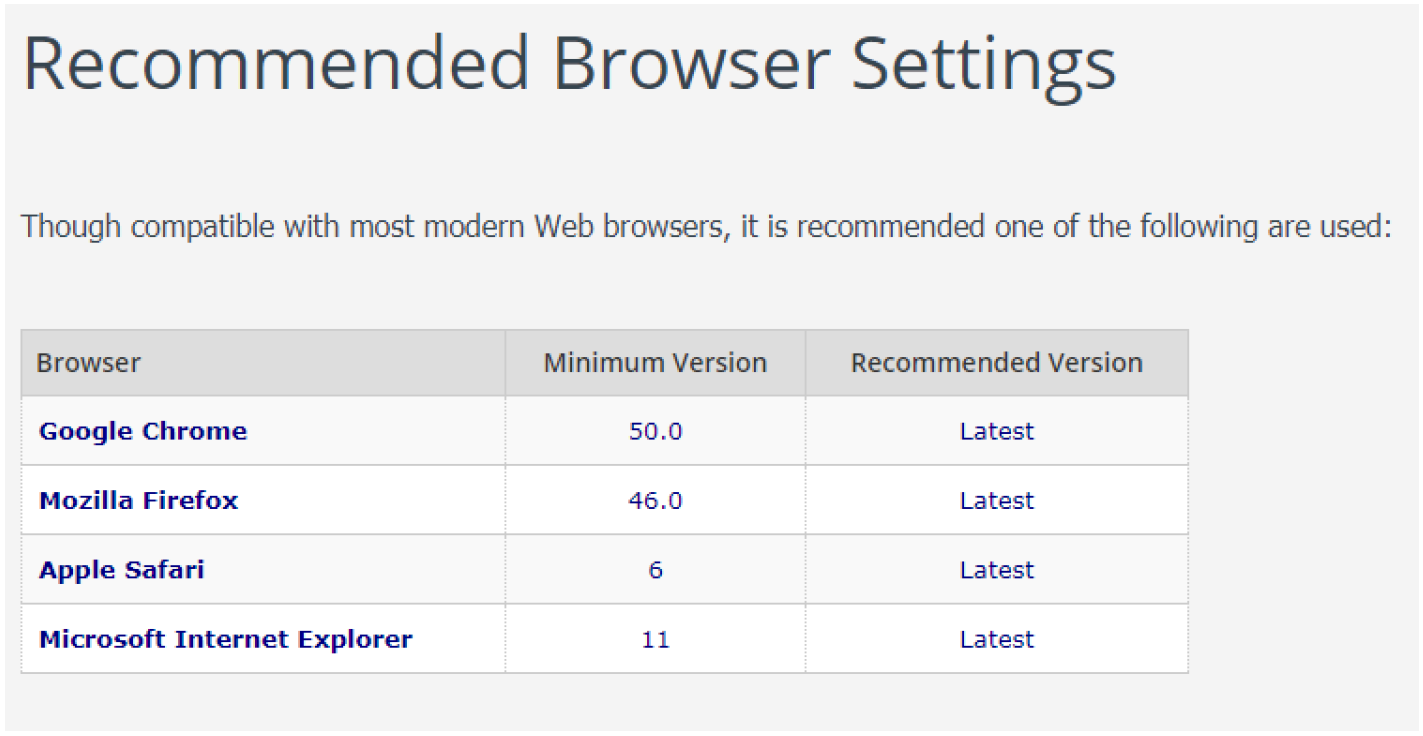
This link will help you or your tech team on setting the browser up.
Click this link: http://topyx.helpdocsonline.com/recommended-browser-settings
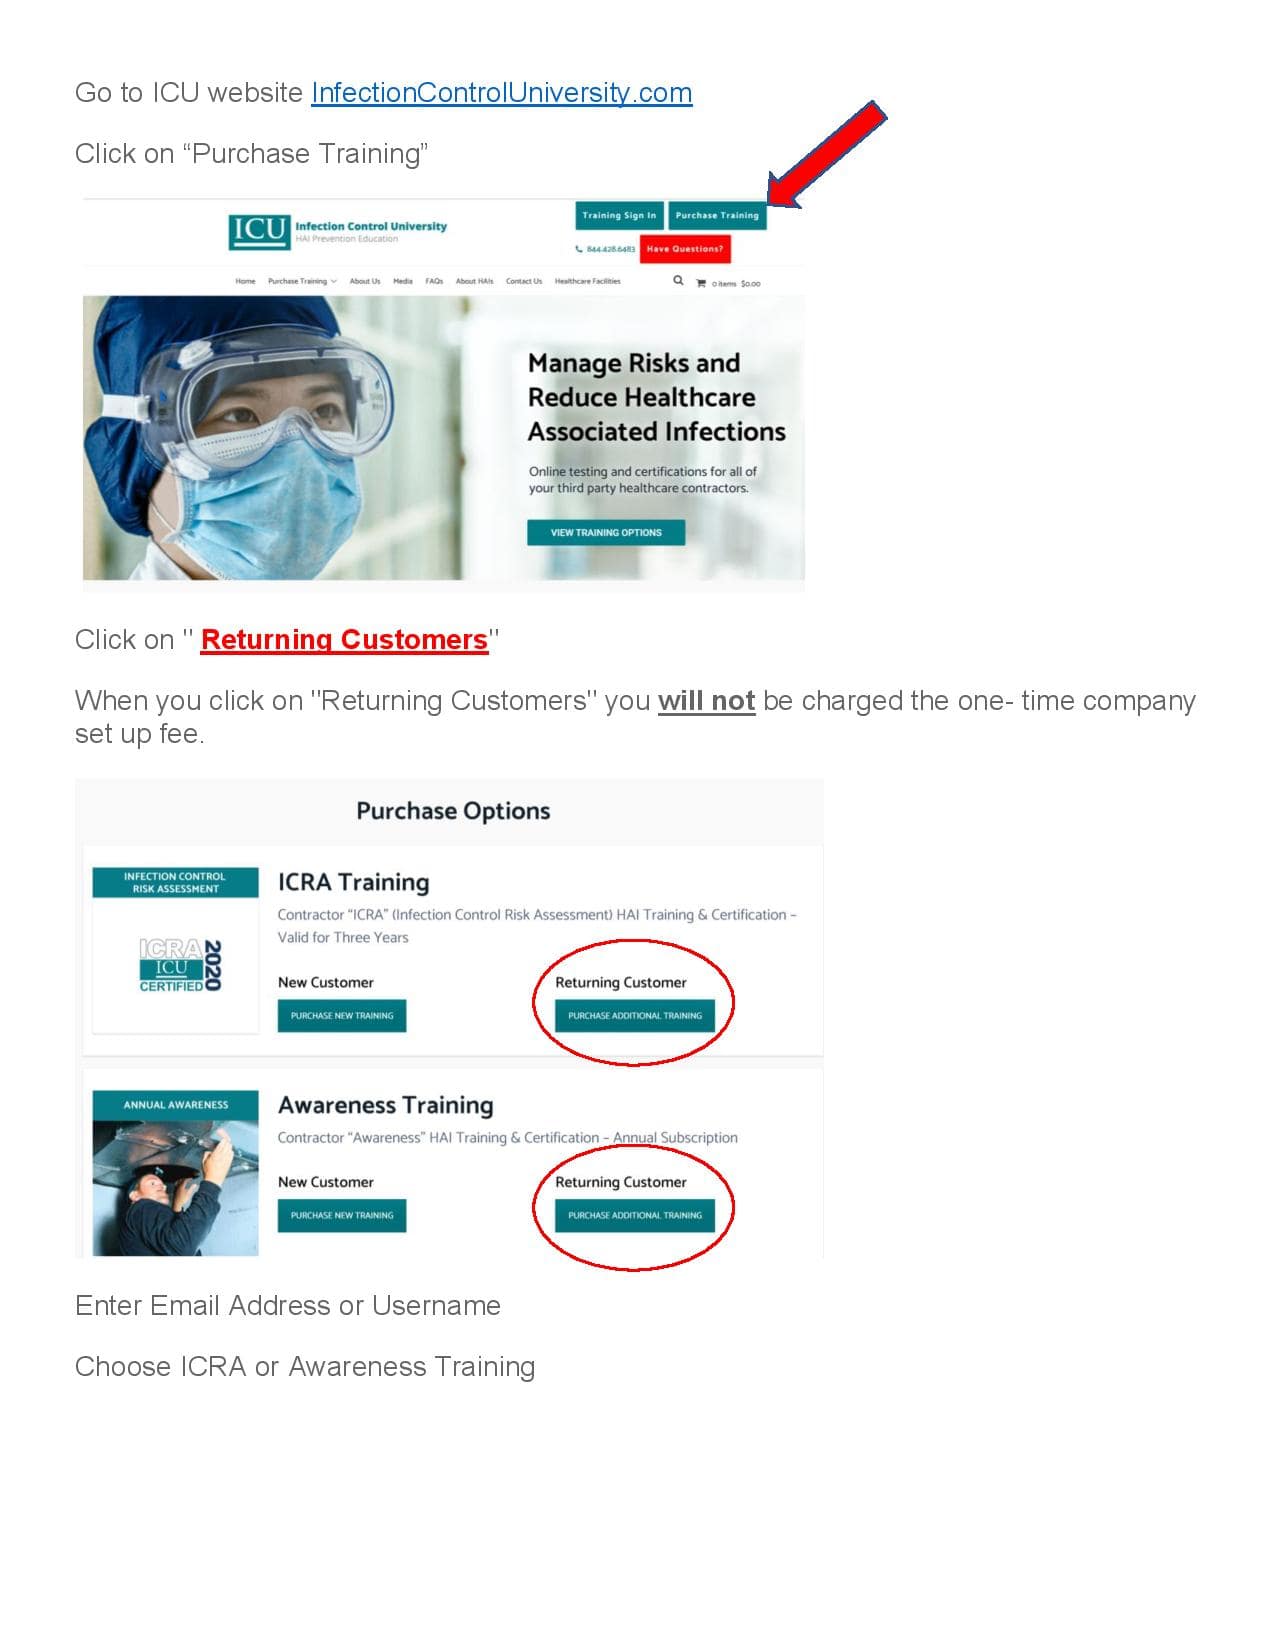
Go to ICU website http://InfectionControlUniversity.com
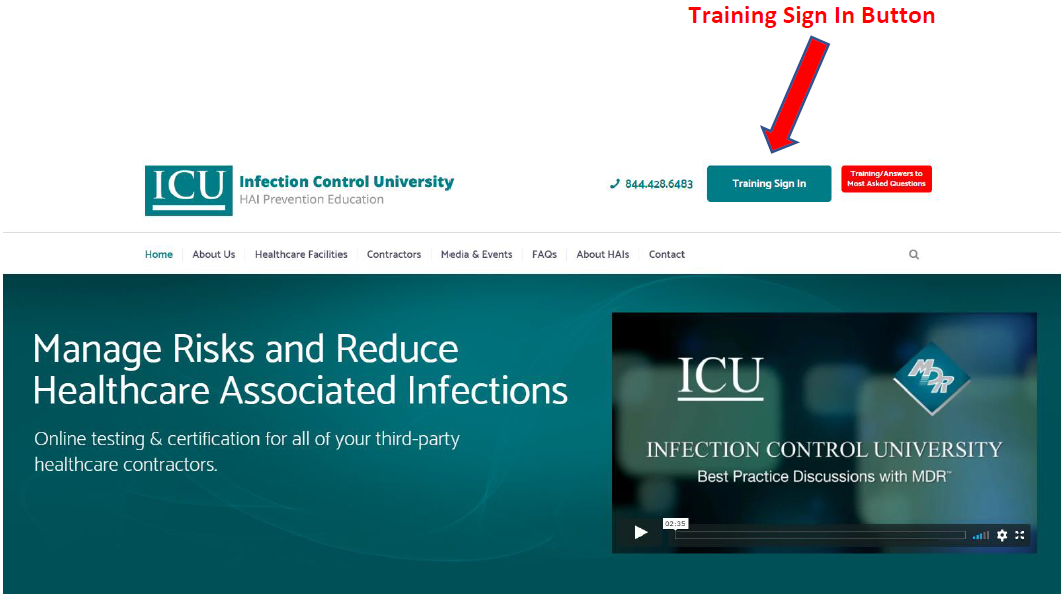
Go to the top right corner and click on Training Sign In.
Use the Login Information that was emailed to you.
If you are not able to log in, copy and paste in your username – this comes directly from Training Software, so it does work.
This takes you directly to the “My training” page. Click Start on your program.
This will take you to another page showing you the number of courses that are in your program. Click Start again and you are ready to watch the video.
After watching the video, click on the quiz. then click “Attempt Quiz Now”, there is 1 question per page.
After you have finished all the questions click “Submit All and Finish”.
Review your score, your quiz answers, etc. It will let you know which questions that you have missed. You must get score of 80% to pass. You can reattempt the quiz as many times as you would like.
Click the “Back” button, it takes you back to video and quiz.
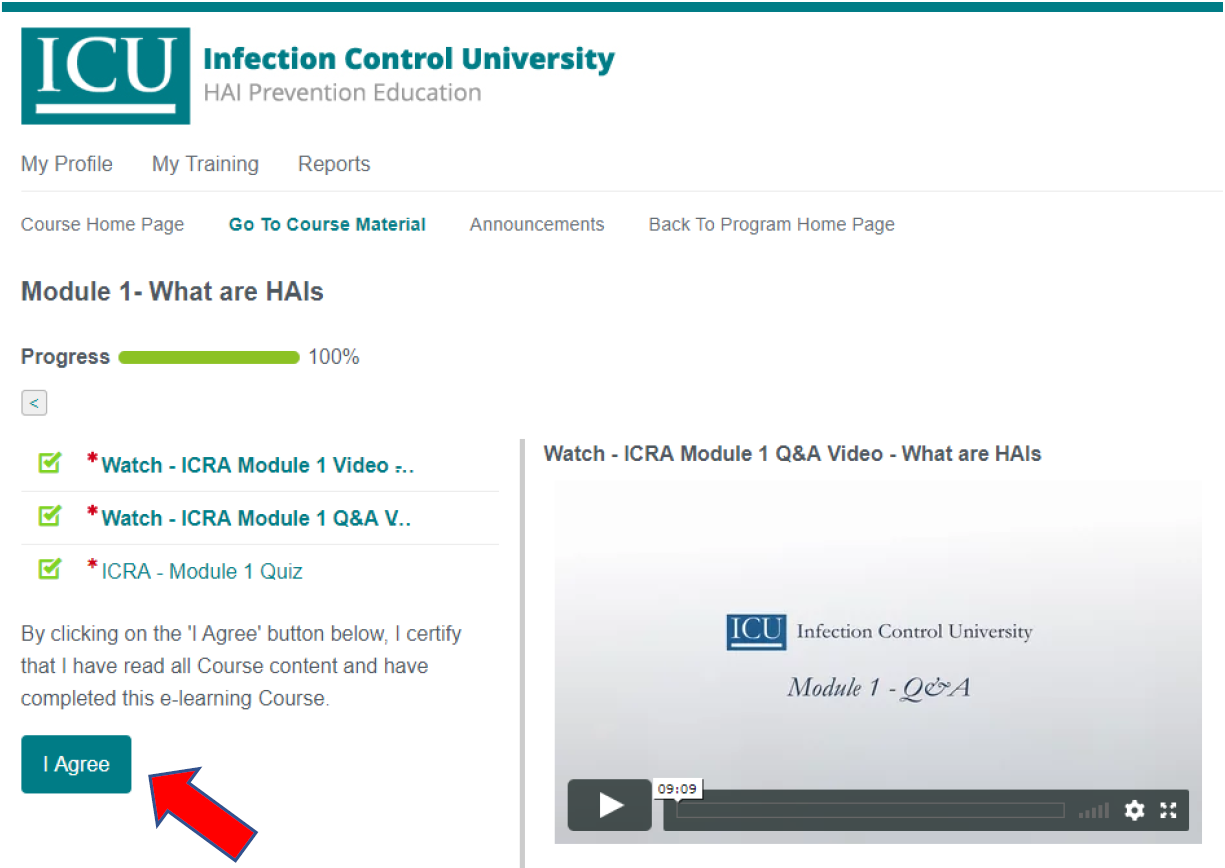
Click the “I Agree” button. This is required by the Hospitals. You are agreeing to the following:
By Clicking on the “I Agree” button below, I certify that I have read all Course content and have completed this e-learning Course.
Once you have clicked the “I Agree” button, you are ready to print / download your certificate.
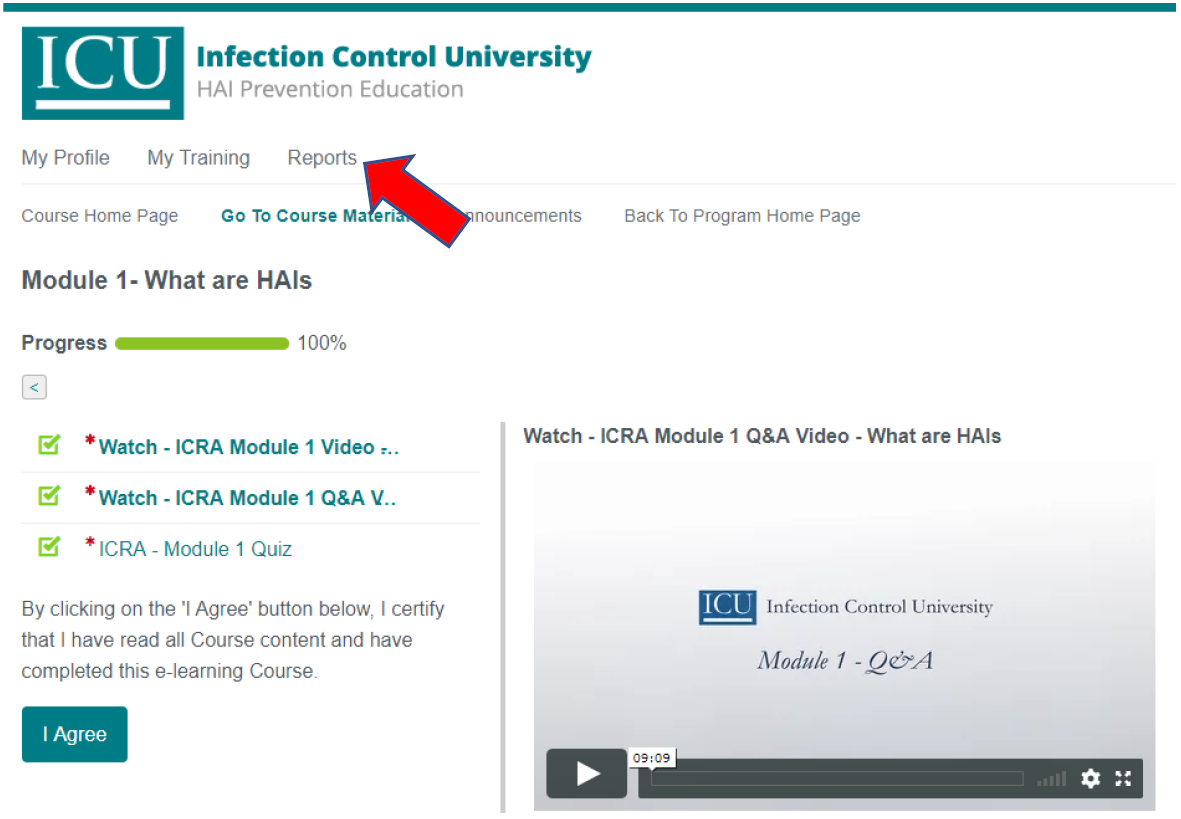
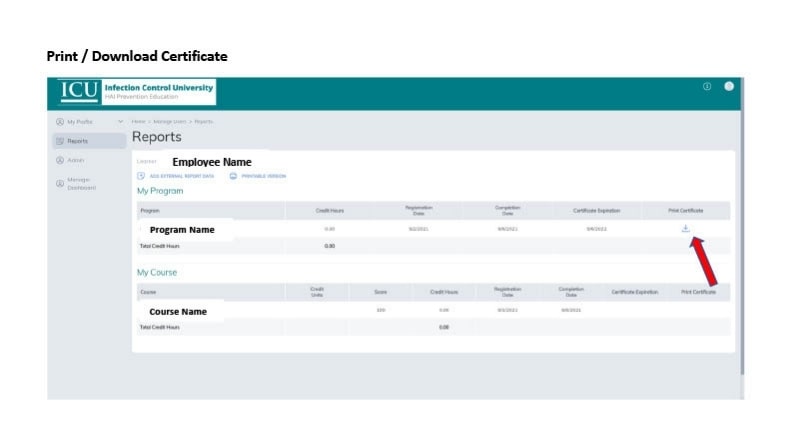
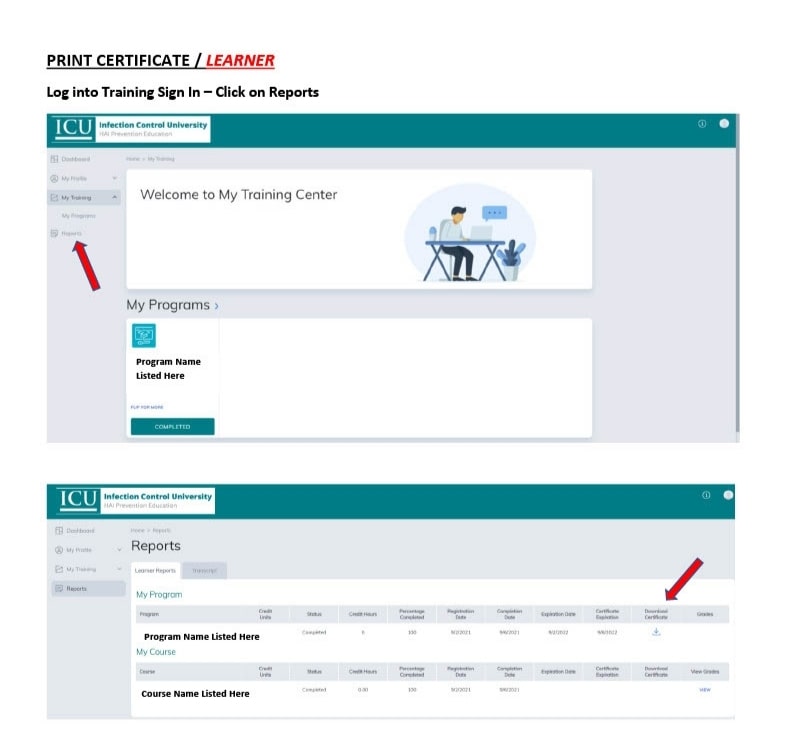
Go to the top of the Screen and click on “Reports” and your transcript will automatically come up.
Go to the far-right corner of the Program where it says “Print Certificate”, click on the Printer Icon. Depending on the browser you are using, it will ask you if you want to save Certificate or Print.
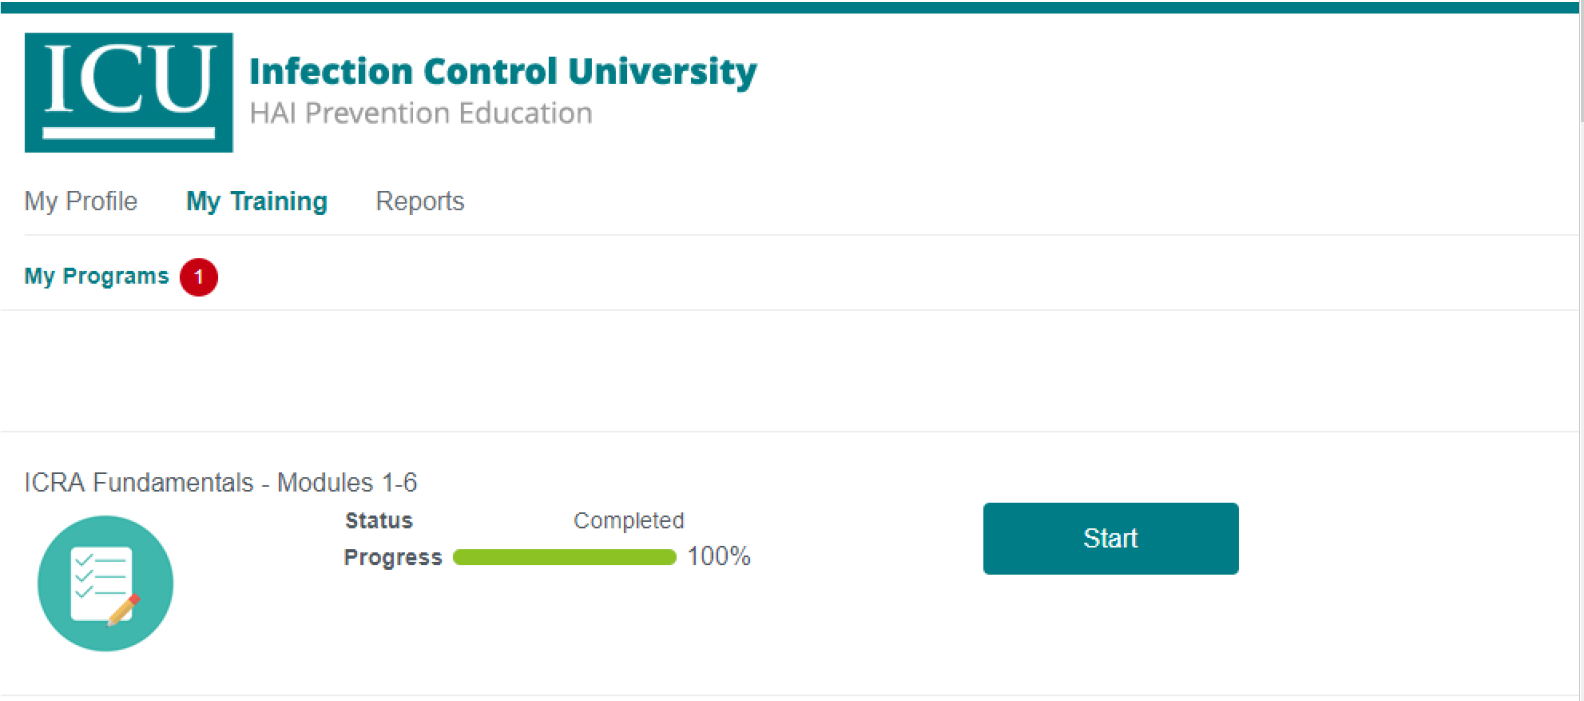
- Main Screen Upon Log-In
Your program will show 100% complete –
you cannot print your certificate until you click on I Agree Button
2. I Agree Button – Click Button For Each Module Watched and Quiz Taken – See Red Arrow Below
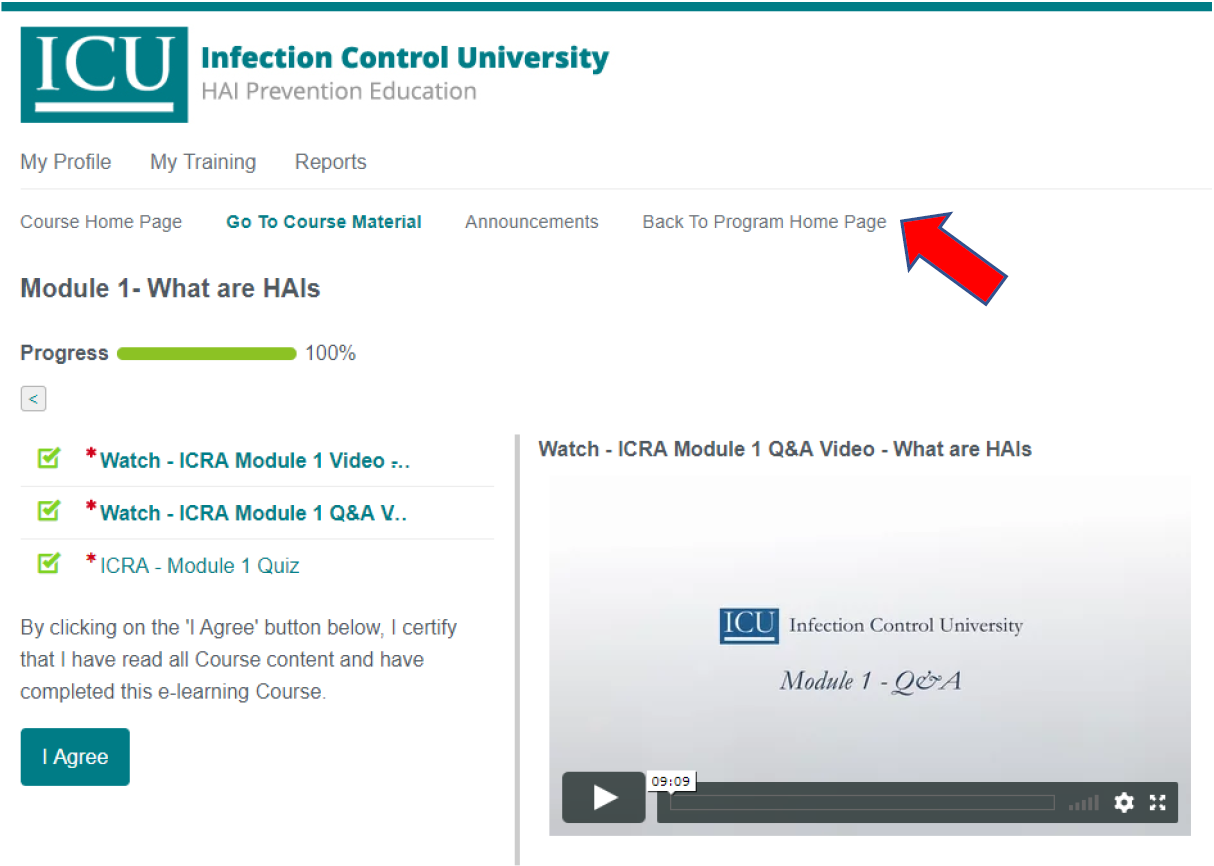
3. To Return to each Module, Click Back to Program Home Page – See Red Arrow Below
4. To Print Certificate After Clicking The “I Agree” Button for Each Module, Click on Reports – See Red Arrow Below. You will see Print/View Certificate and you can print Transcript.
Your badge will be mailed to the Manager / Point of Contact for you group.
Your browser is a software application that lets you visit web pages on the Internet. Popular browsers include Google Chrome, Firefox, and Safari. Currently, Google Chrome is the most widely used browser in the world, and is also considered one of the fastest and most secure.
How do I Know Which Browser I am Using?

This link will help you or your tech team on setting the browser up.
CLICK ON THIS LINK: http://topyx.helpdocsonline.com/recommended-browser-settings

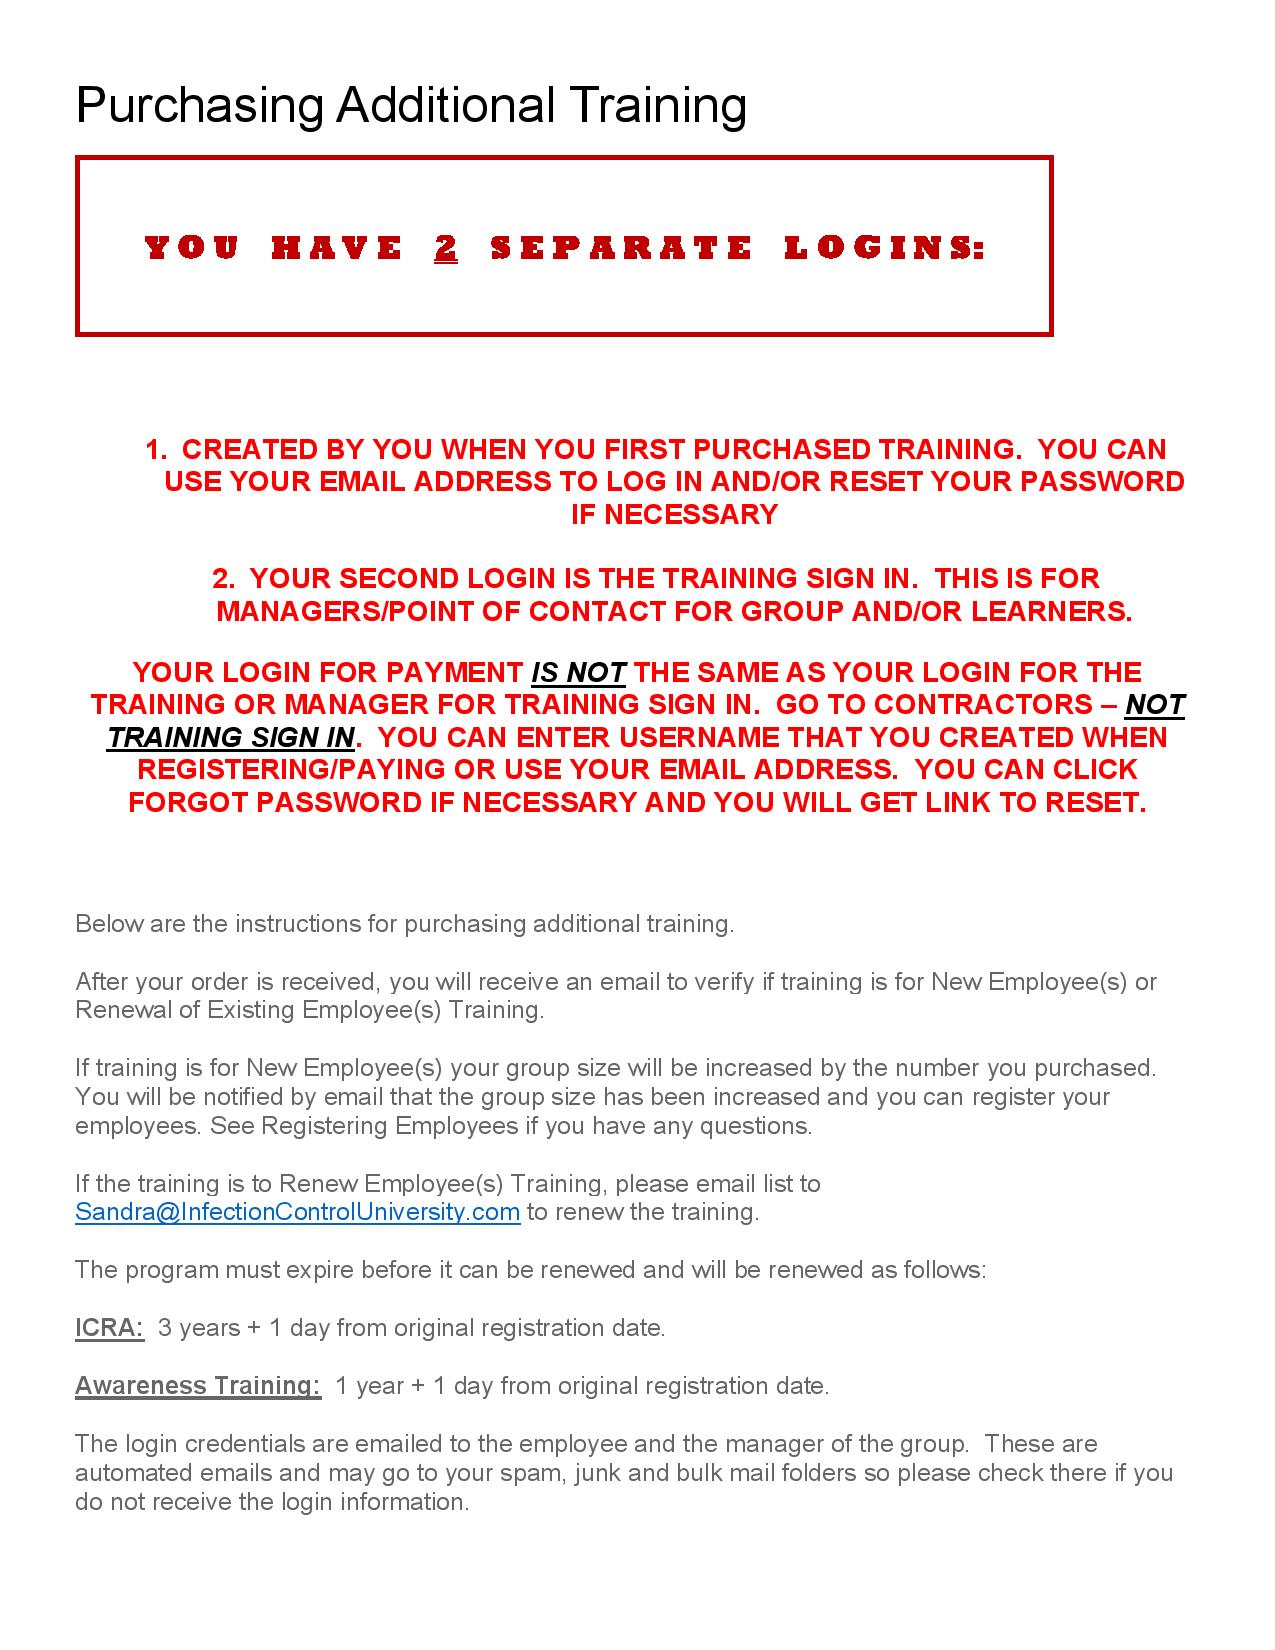
- The first one is the login that you created when paying for training.

2. The second is for Manager/Point of Contact for your group, and if you are taking the
training you will click on the Training Sign In. See red arrow below. The Manager/
Point of Contact of the group will receive automated copies of Registration Notices,
Completion Notices and there are many reports you can run under the Reports Tab. If
you hover with your mouse over the report title, it shows you what is contained in the
report.
If you are Manager/Point of Contact for your group and NOT taking the training, your
Role will show up as Manager.
If you are Manager/Point of Contact for your group and taking the training, your Role
defaults to Learner. When you need to change Role to Manager, go to top right corner
of screen where you see Learner and use pull down box to change to Manager.
DEFAULT ROLE IS LEARNER IF YOU ARE LEARNER AND MANAGER


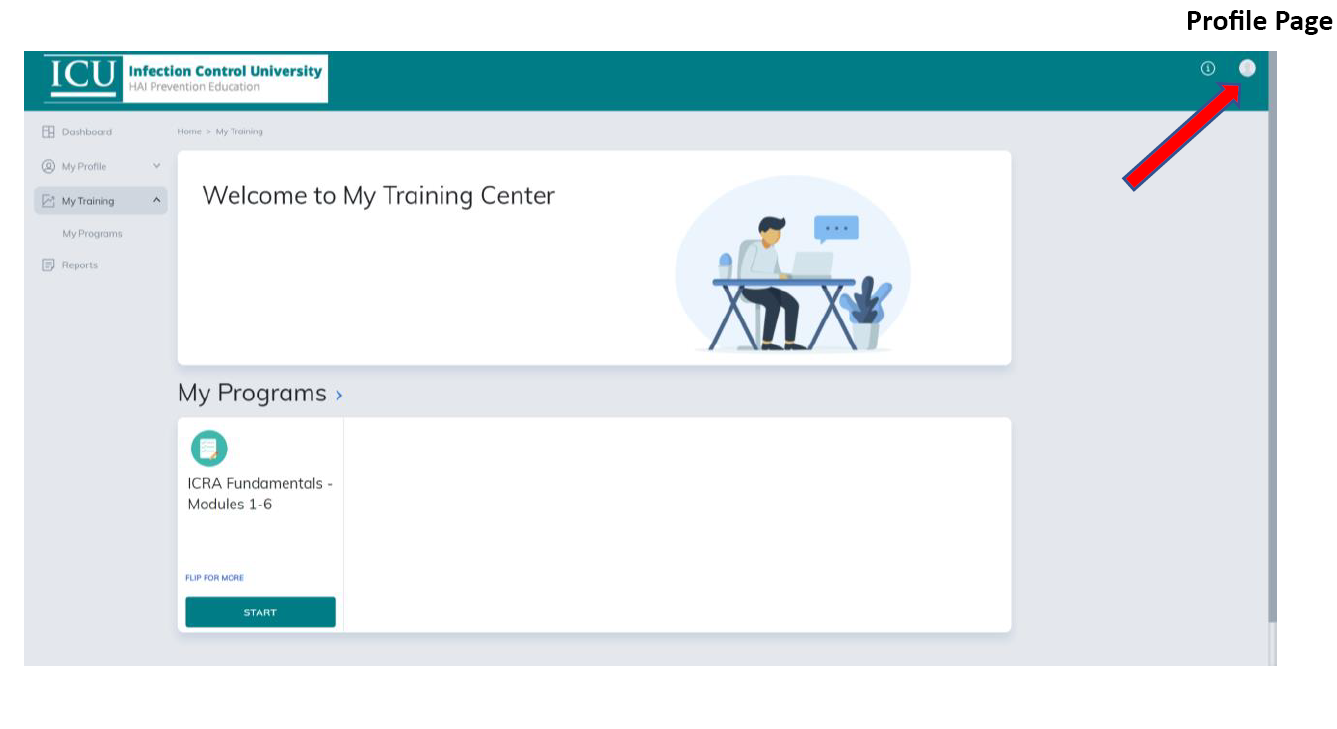
- If you are a Manager and a Learner, the default Role is Learner, click on Profile Page ( see red arrow below ) and change Role to Manager. If you are Manager only Role will be on Manager automatically.
 MANAGER DASHBOARD
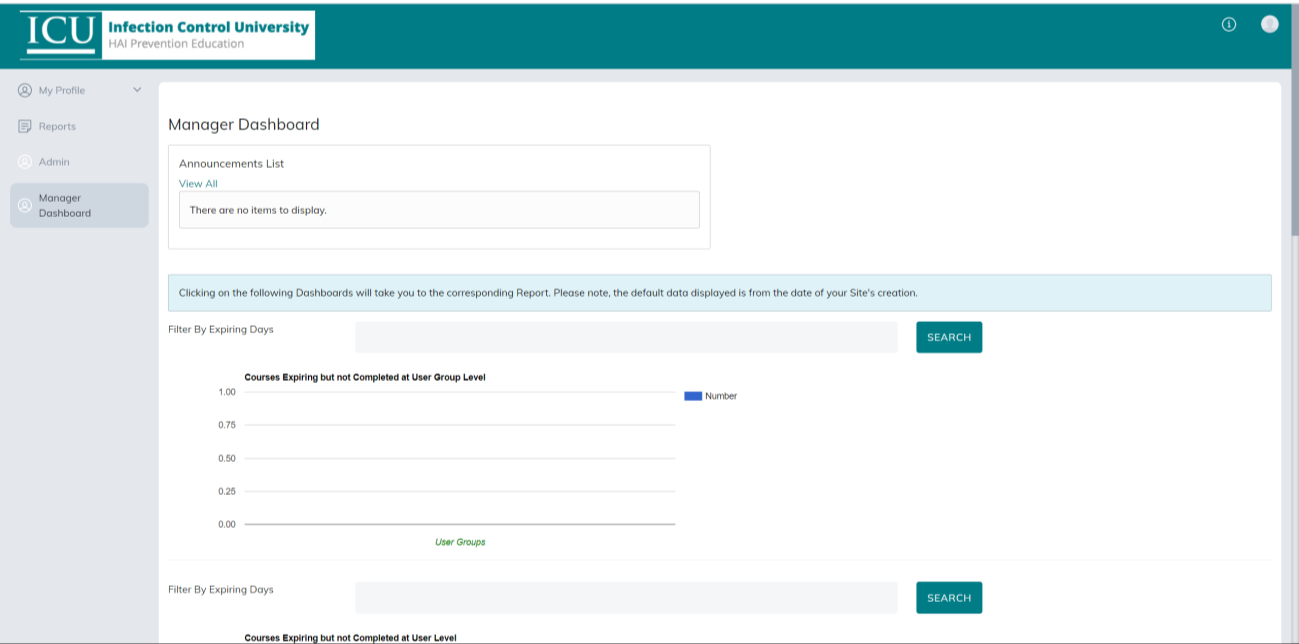
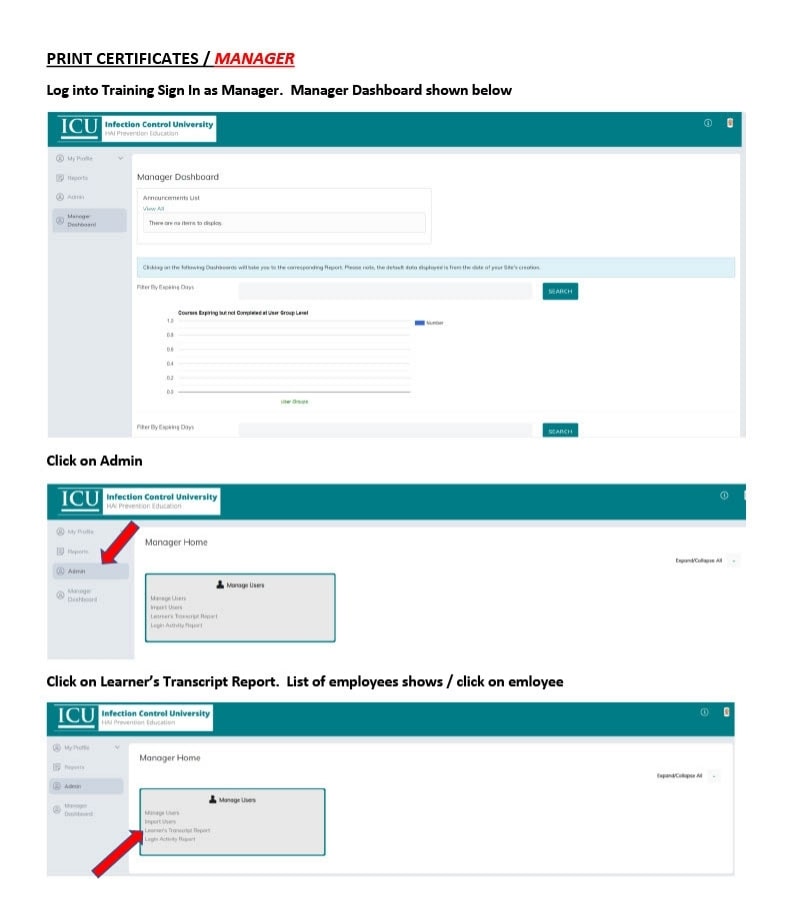
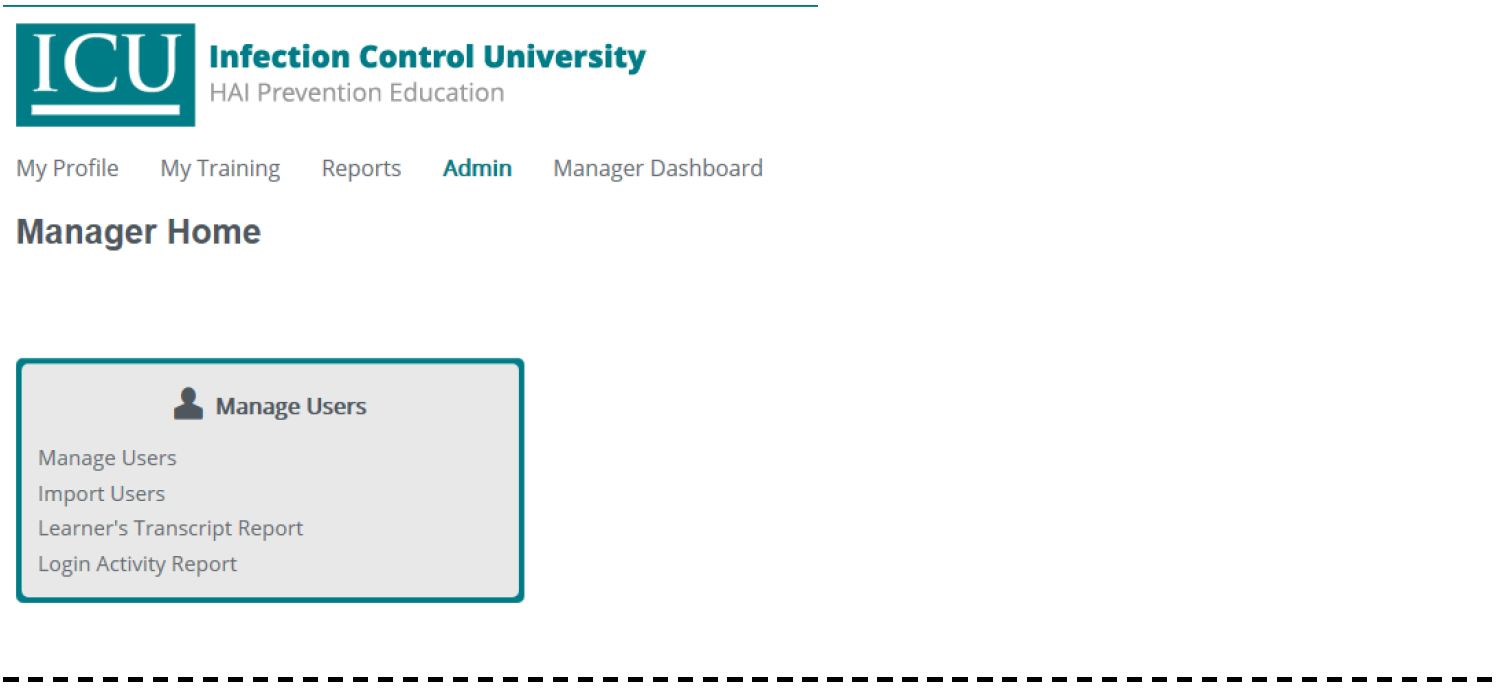
2. From Manager Dashboard click on Admin ( see below).
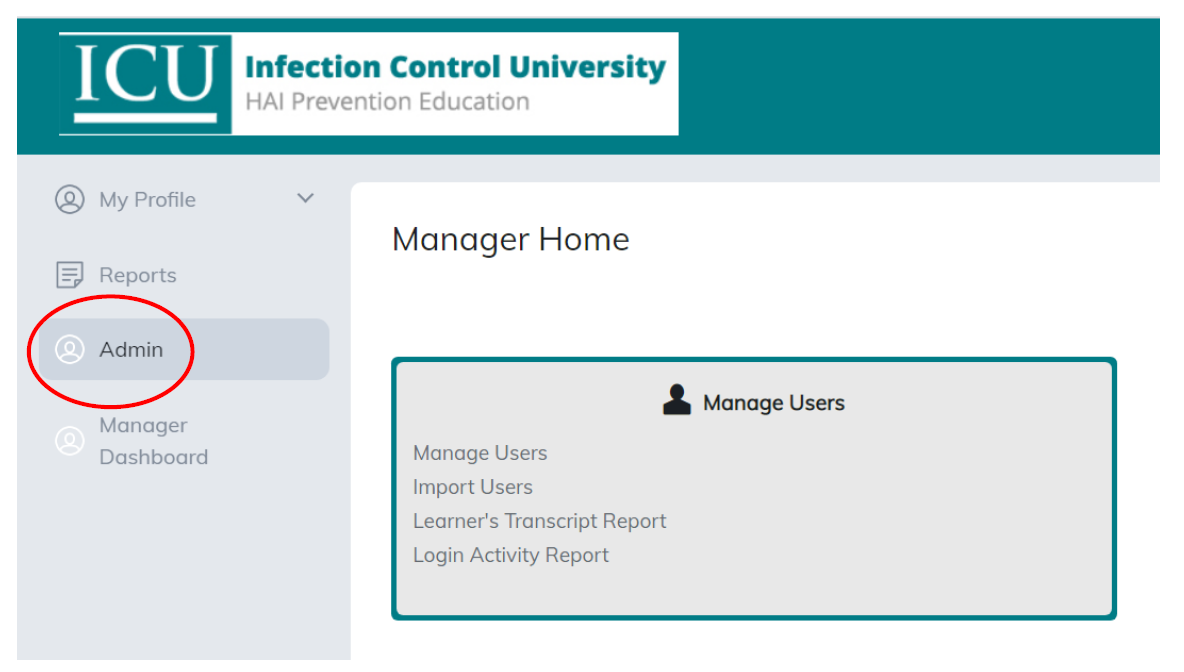
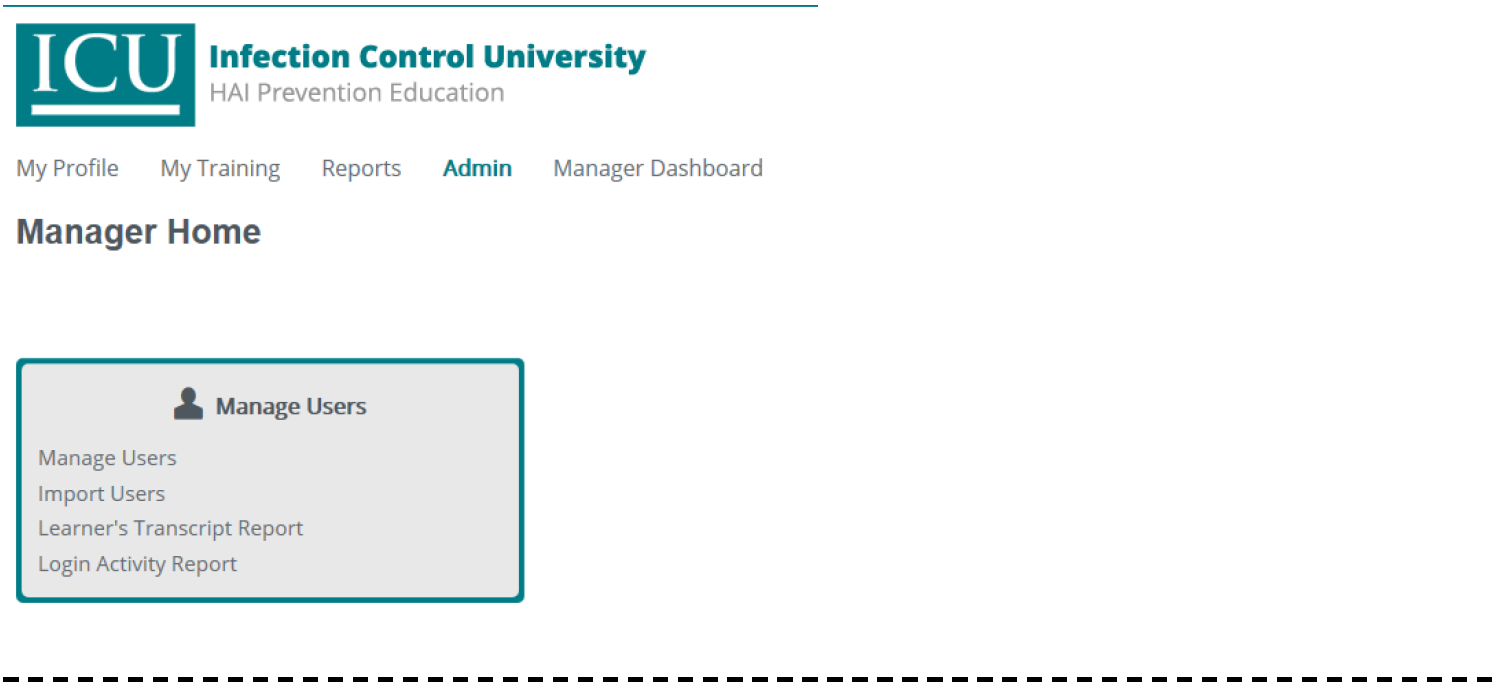
3. Click on Manage Users.
 4. Click on Add Users

5. Once you click on Add User the following screen will appear. Any fields with red stars * are required field. See example:
USER DETAILS: THIS IS DETAILS FOR USER YOU ARE ADDING – NOT YOUR OWN – CREATE A USERNAME & ****IT CAN BE YOUR EMAIL ADDRESS
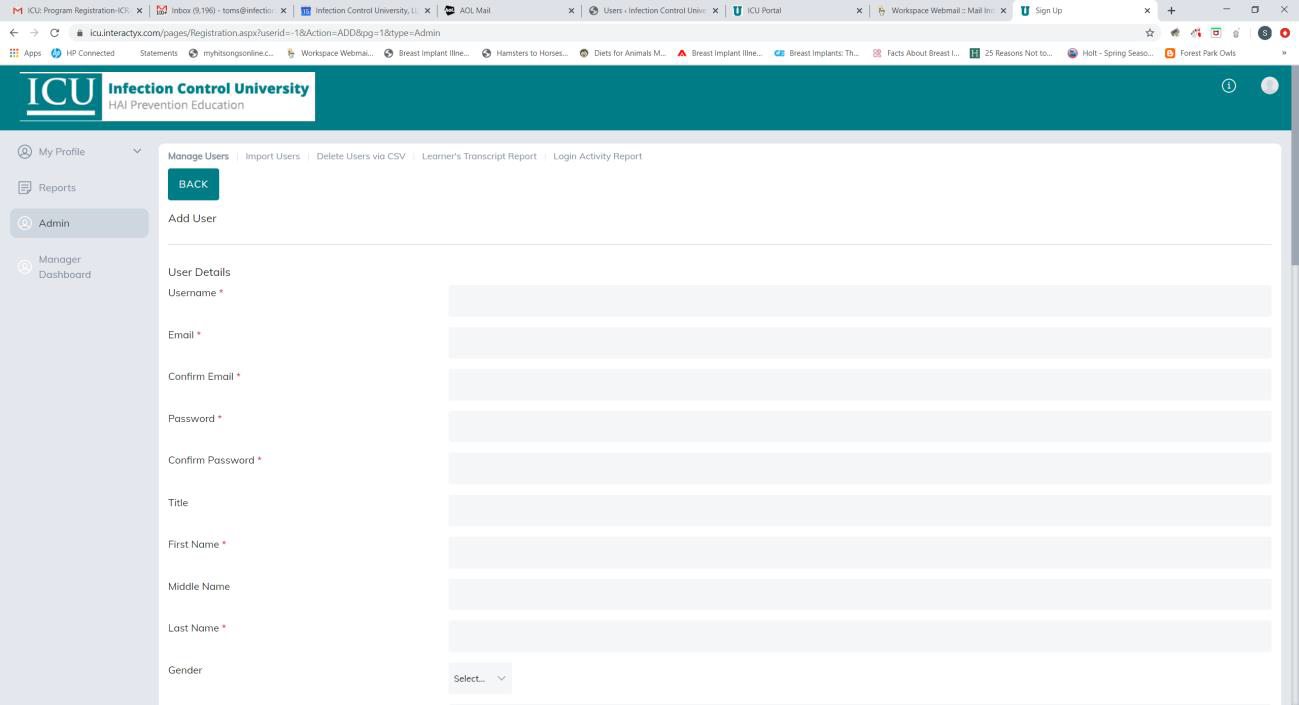
Complete the registration set up completing any lines with * these are required fields, the rest are optional fields.
 5. Click Register to Complete the Registration process. A User Registration Notice and a Program Registration Notice will be sent to User and Manager of Group.
-
- a. The Username is the only unique identifier in the site. Users must have unique Usernames. Please consider using: Email Address, FirstNameLastName_yourcompanyname. i.e. AmySmith_abccompany.com. The user name is not case sensitive
b. Username (must be unique) hyphens, commas, spaces and apostrophes cannot be used in Username, i.e., O’Brien must be typed OBrien – no apostrophes. Smith-Jones must be typed SmithJones – no hyphens. YOU CAN USE YOUR EMAIL ADDRESS.
c. First Name – This is the Users First Name and will appear on certificate & badge if applicable. Can only contain letters
d. Last Name – This is the Users Last Name and will appear on certificate & badge if applicable. Can only contain letters
e. Email Address
f. Password – password is case sensitive
g. Continue completing all the Required Fields (fields with red stars *)
h. All other fields are not required – they can be completed if you would like to complete them.
i. Once complete, your Group Name will appear – see sample below. Where it says Test Group, your company name will appear. You must check the box next to your company name.
j. Click Register. Users will be registered to Program required by Hospital.
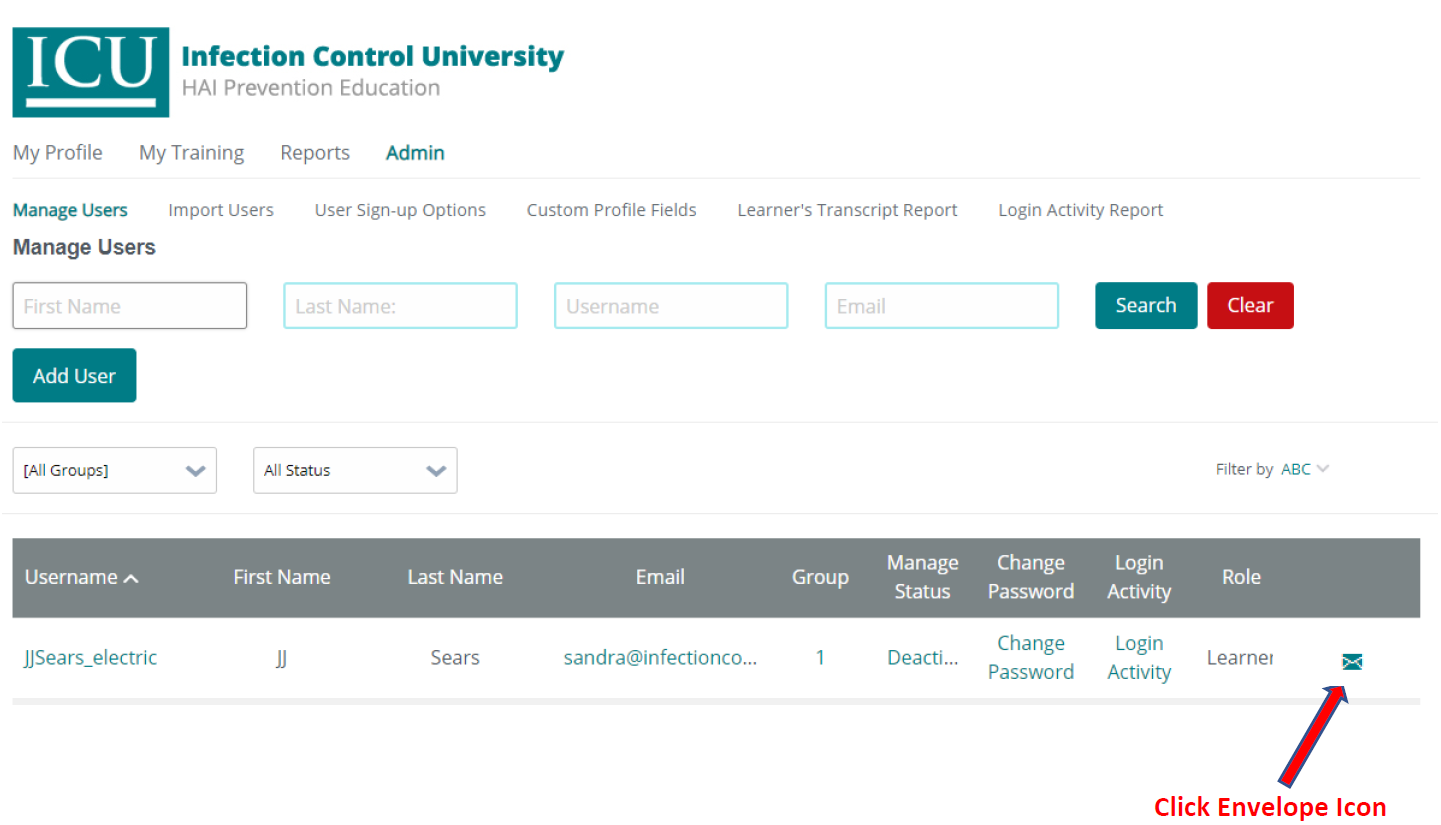
k. A Computer-Generated User Registration Notice will be automatically sent to the User & the Manager. ICU does not receive copies of the User Registration Notice. If you need to re-send a notice to an employee, click on Admin, Manage User and all of the users in your group will be listed. You will see an envelope on the far right side of screen – click envelope and a new registration notice will automatically be sent to the User and the Manager.
- a. The Username is the only unique identifier in the site. Users must have unique Usernames. Please consider using: Email Address, FirstNameLastName_yourcompanyname. i.e. AmySmith_abccompany.com. The user name is not case sensitive
 **Because the User Registration Notices are computer generated, they may go in your Spam and Trash Folder/check the Spam & Trash folders after registration if you do not receive a notice.
Manage Users / Add Users
1. To add an individual user, Go to Admin, Manage Users, click Add User.
2. On the next screen you are taken to the “Sign Up” form where you can enter a username, email, and
password. Username CAN be email address
3.YOUR DETAILS – THIS IS DETAILS FOR THE USER YOU ARE CREATING – NOT YOUR OWN DETAILS – CREATE A USERNAME FOR YOUR EMPLOYEE.
4. Having filled out the required fields (marked with a red star *), and any additional information, you must click on your company name. Press “REGISTER”.
5. There is the ability to change a user password in the Manage Users screen.
6. To change a user password, click on Change Password, corresponding to the username that you require.
7. The next screen allows you to allocate a new password to a user.
8. Click Login Activity to go to the Generate a User Report screen.
9. To generate a user report, mark a calendar date range of choice – the range for which you wish to view login activity of that user. Press Generate.
10. To get back to the Manage Users screen, select the option “Manage Users” from the sub-menu. This will take you back to the default home page for Manage Users.


InfectionControlUniversity.com
YOUR LOGIN FOR PAYMENT IS NOT THE SAME AS YOUR LOGIN FOR
THE TRAINING OR MANAGER FOR TRAINING SIGN IN. GO TO
CONTRACTORS – NOT TRAINING SIGN IN. YOU CAN ENTER
USERNAME THAT YOU CREATED WHEN REGISTERING/PAYING OR
USE YOUR EMAIL ADDRESS. YOU CAN CLICK FORGOT PASSWORD IF
NECESSARY AND YOU WILL GET LINK TO RESET.
Click on Contractors
Click on “Returning Customers Click Here”
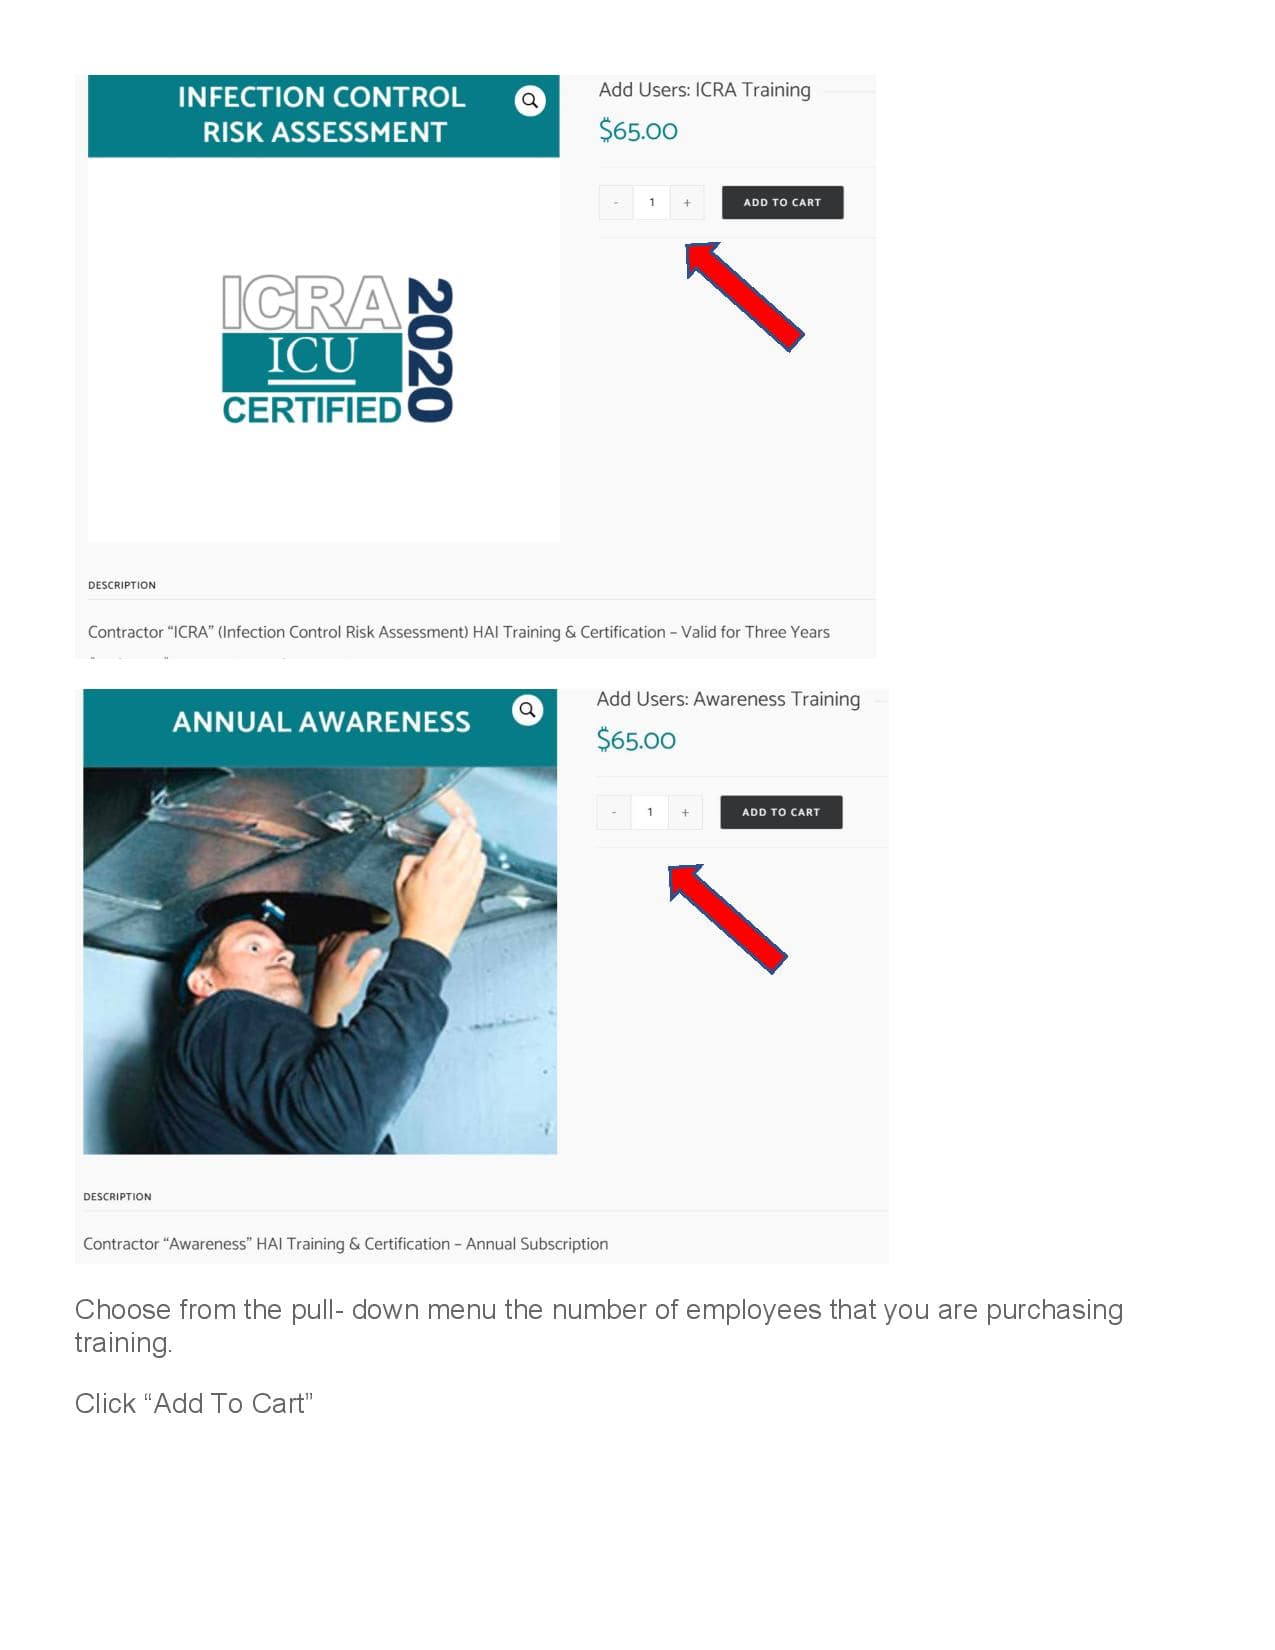
Click on Program/Course to be renewed
Choose the number of employees that will renew the training
Continue to the checkout
Once your order is received by ICU:
- You will receive an email asking which current employees need to be
renewed or deactivated because they are no longer with your company
or no longer at a particular hospital job. - If you have any new employees to be registered for the training
- ICU will make the adjustments to your group as far as renewing
employees for training or deactivating employees. - The number available to your group will be adjusted accordingly
- You can then add your new employees to your group. They will
automatically be registered to the appropriate program/course. An
automated email will be sent to employee and Manager/Point of
Contact for your group. - Check your Spam, Junk, Trash and Bulk Email folders – the are
automated email messages.
Click on Admin
Click on Manage Users – all users in your group will be listed / click on user
Click on envelope icon below resend the registration notice to user(s)
Refund/Cancellation Policy: You have the right to cancel your order up to ten (10) days
from the date of purchase. Requests for refund or cancellation must be made by
contacting Infection Control University (ICU) by email – contact information as follows:
[email protected]. The request must be made prior to midnight of
the tenth calendar day from the date of purchase.
ICU will not grant a refund under any of the following circumstances: Learner/User has
logged into course/program, course/program started, course/program completed.
After ten days from the date of purchase all sales are final and no refunds will be provided.
- All refunds are subject to a 15% administration fee
- Refunds may take up to 30 days to process
Transferring Training from One Learner/User to Another: You have the right to transfer
registration of Learner/User up to sixty (60) days from the date of registration.
In the event a Learner/User has not logged into the course or program, and you need to
change the Learner/User, contact ICU by email ([email protected])
of the Learner/User that needs to be removed from training roster. ICU will delete them
and email the Manager/Point of Contact for group that you can register your Learner/User
to the course/program. For questions on Adding Users, see our Frequently Asked
Questions.
ICU will not grant a transfer of training under any of the following circumstances:
Learner/User has logged into course/program, course/program started, course/program
completed.
After sixty days from the date of registration all registrations are final and no transfer of
training from one Learner/User to another will be accepted. Manager/Point of Contact for
Group can deactivate Learner/User but they are still counted in your group total.
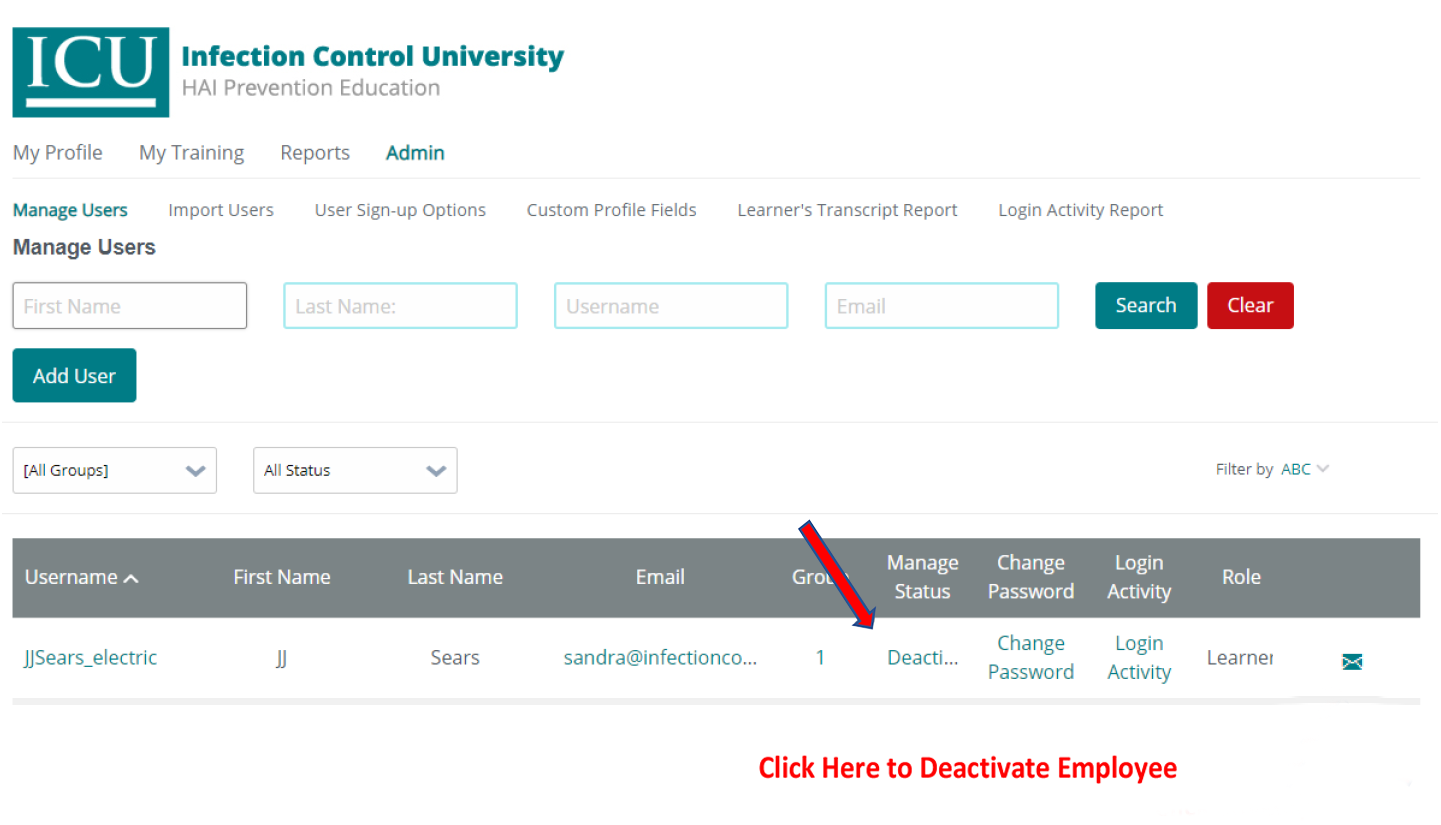
Click on Admin
Click on Manage Users – all users in your group will be listed
Click on Employee’s Name that you need to Deactivate
Click on Deactivate user no longer at your company or working at facility
- If you are a Manager and a Learner, the default Role is Learner, click on Profile Page (see red arrow below) and change Role to Manager. If you are Manager only Role will be on Manager automatically.
 MANAGER DASHBOARD
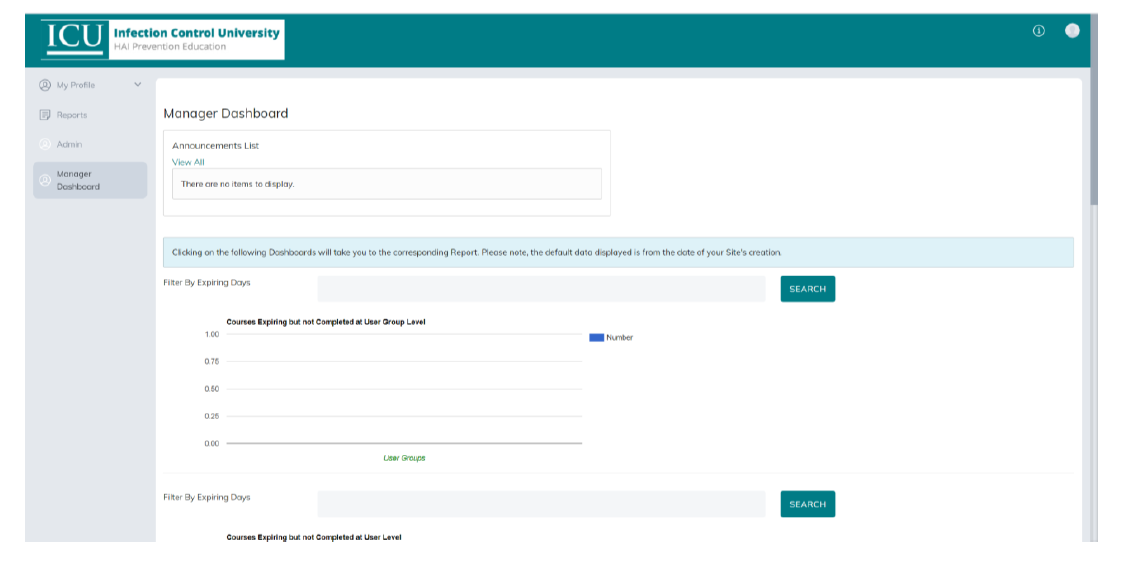 2. From Manager Dashboard click on Admin (see below)
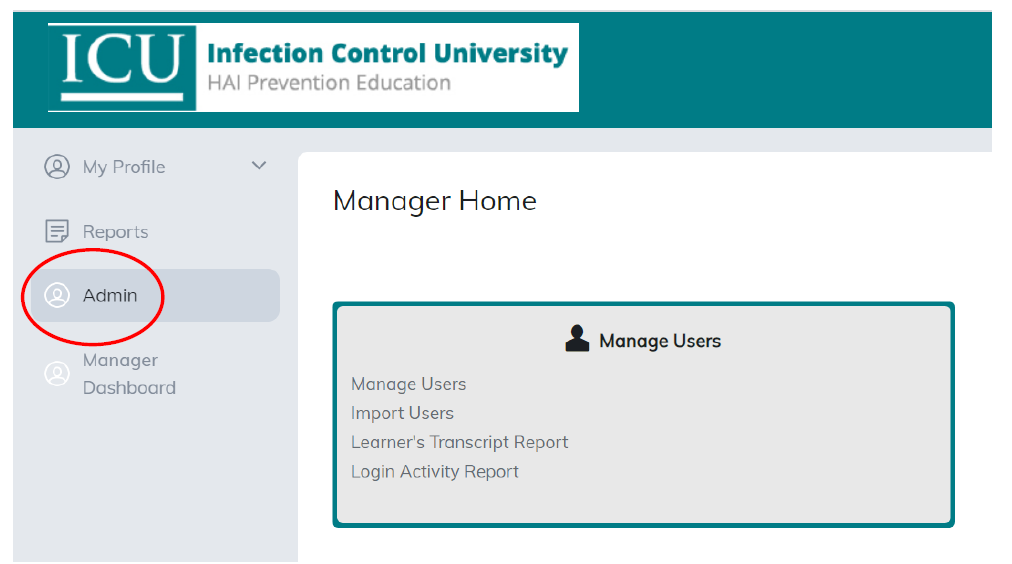
3. Click on Manage Users
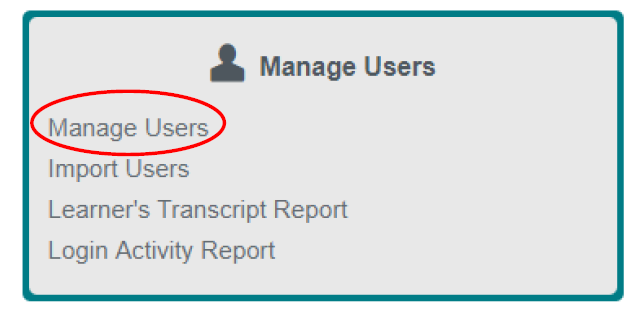 4. Click on Add Users

Once you click on Add User the following screen will appear. Any fields with red stars * are required field. See example:
USER DETAILS: THIS IS DETAILS FOR USER YOU ARE ADDING – NOT YOUR OWN -CREATE A USERNAME & ****IT CAN BE YOUR EMAIL ADDRESS
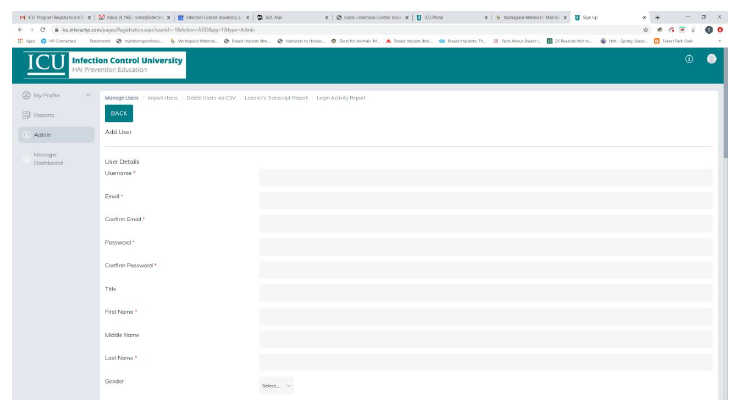
Complete the registration set up completing any lines with * these are required fields, the rest are optional fields.

5. Click Register to Complete the Registration process. A User Registration Notice and a Program Registration Notice will be sent to User and Manager of Group.
a. The Username is the only unique identifier in the site. Users must have unique Usernames. Please consider using: Email Address, FirstNameLastName_yourcompanyname. i.e. AmySmith_abccompany.com. The user name is not case sensitive
b. Username (must be unique) hyphens, commas, spaces and apostrophes cannot be used in Username, ie., O’Brien must be typed OBrien – no apostrophes. Smith-Jones must be typed SmithJones – no hyphens. YOU CAN USE YOUR EMAIL ADDRESS
c. First Name – This is the Users First Name and will appear on certificate & badge if applicable. Can only contain letters
d. Last Name –This is the Users Last Name and will appear on certificate & badge if applicable. Can only contain letters
e. Email Address
f. Password – password is case sensitive
g. Continue completing all the Required Fields (fields with red stars *)
h. All other fields are not required – they can be completed if you would like to complete them.
i. Once complete, your Group Name will appear – see sample below. Where it says Test Group, your company name will appear. You must check the box next to your company name.
j. Click Register. Users will be registered to Program required by Hospital.
k. A Computer-Generated User Registration Notice will be automatically sent to the User & the Manager. ICU does not receive copies of the User Registration Notice. If you need to re-send a notice to an employee, click on Admin, Manage User and all of the users in your group will be listed. You will see an envelope on the far right side of screen – click envelope and a new registration notice will automatically be sent to the User and the Manager.
To Resend a Registration Notice:

TO RESEND REGISTRATION NOTICE CLICK HERE ON
ENVELOPE PICTURE
**Because the User Registration Notices are computer generated, they may go in your Spam and Trash Folder/check the Spam & Trash folders after registration if you do not receive a notice.
Manage Users / Add Users
1. To add an individual user, Go to Admin, Manage Users, click Add User.
2. On the next screen you are taken to the “Sign Up” form where you can enter a username, email, and password. Username CAN be email address
3. USER DETAILS – THIS IS DETAILS FOR THE USER YOU ARE CREATING – NOT YOUR OWN DETAILS – CREATE A USERNAME FOR YOUR EMPLOYEE.
4. Having filled out the required fields (marked with a red star *), and any additional information, you must click on your company name. Press “REGISTER”.
5. There is the ability to change a user password in the Manage Users screen.
6. To change a user password, click on Change Password, corresponding to the username that you require.
7. The next screen allows you to allocate a new password to a user.
8. Click Login Activity to go to the Generate a User Report screen.
9. To generate a user report, mark a calendar date range of choice – the range for which you wish to view login activity of that user. Press Generate.
10. To get back to the Manage Users screen, select the option “Manage Users” from the sub-menu. This will take you back to the default home page for Manage Users.

